In the previous blog posts I used free and open source forensic tools to view the content and file structure of the Android Discord app. After some testing and validation the presentation of the contents that the tools provide is understandable but not really intuitive nor user friendly.
What if you wanted to view the app content as the Android device presented it to the user without manipulating the device where the data originally came from? By using an Android emulator we can view the contents using the app itself as our viewer. Free tools will be used for this analysis.
Test Device
- Samsung SM-G530T Galaxy Grand Prime
- OS 5.1.1
- Rooted
Tools
- Android Discord App with test data
- Magnet Forensics Acquire 2.0.3.8168
- Nox Player 5.0.0.1 - Android Emulator
- ADB - Android Debugging Bridge
- FTK Imager 3.4.2.6
Extraction
Using Acquire a physical source image of the phone is created.
 |
| Magnet Acquire Acquisition |
- /app/com.discord-1
- /data/com.discord
The app data folder contains the Discord application itself. It is named "base.apk".
 |
| Discord APK - base.apk |
The data folder has all the content related to the app. Be aware that different apps will require different folders to be identified and exported. For example some apps use the SD card to store data needed for the app to work properly. Using a test device, identify all the folders needed by the app then export them from the source image.
 |
| Discord Data Folder |
 |
| Tablet Mode |
If the app being worked on is from a phone, change the mode and resolution accordingly.
 |
| Change Mode & Resolution |
Since I am using a test phone, here is how the emulator looks after the change.

Leave your emulator running since we will connect to it using ADB.
ADB - Connecting and pushing extracted data to the emulator
We will use ADB to connect to the emulator and push into it the data repositories we identified previously. Nox comes with ADB already available in the main installation folder. For a default installation the Nox ADB will be found at C:\Program Files(x86)\bin\adb.exe or adb_nox.exe.
Open a command prompt at the previous path and connect to the emulator using the following command:
- adb connect 127.0.0.1:62001
To test connectivity use the following command:
- adb devices
If successful you should see the following on your screen.
 |
| Connected to Emulator |
In another command prompt open a shell to the emulator using ADB.
- adb shell
 |
| ADB Shell |
The first command prompt will be used to push/upload the apk. The second command prompt will enable us to interact with the emulator's file system.
Use the following command, in the first command prompt, to push the apk into the emulator into the corresponding directory:
- adb push base.apk /data/app
 |
| APK to Emulator |
The application will appear on the home screen of the emulator. Press on it to initialize it. By starting the apk, the folder structures needed by the app will be created in the emulator.

After seeing the initial screen, press the Recent Taks button in the emulator (the square above the >> on the lower right side of the screen) and swipe away the app.
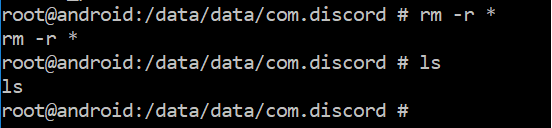
Before we push the app data to the emulator we need to delete the folders that were created by the app when we initialized it.
On the second command prompt, the one with the ADB shell, navigate to the following folder:
- /data/data/com.discord
There you will see all the folders that were created by initialization. Use the following command to delete them:
- rm -r *
 |
| Delete App Folders |
Go back to the first command prompt and push the extracted data app to the folder we just emptied.
- adb push com.discord /data/data/com.discord
 |
| Extracted App Data pushed to Emulator |
If the push was successful the following will be seen on the prompt:
 |
| Successful Push |
On your ADB shell prompt you will now see that the folders extracted from the image are now located within the emulator.
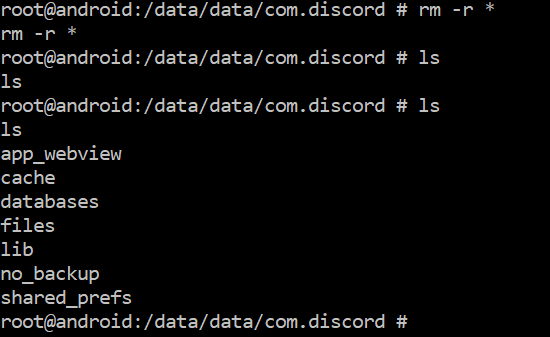 |
| Successful Push - Folder Structure |
To summarize so far we have:
- Made a physical source image from the target device.
- Extracted the target app and app folders (Discord.)
- Push the extracted app to the emulator and initialize it.
- Close the app and delete the app created folders.
- Push the extracted app folders and their content to the emulator.
Go to the home page on the emulator and press the Discord app. All the content of the app can now be viewed in the emulator.
 |
| Discord Direct Message |
Considerations
This method of review is really useful for showing the extracted data to non technical people. It is a great visual aid to see the data as the original user would have seen it herself.
When doing this type of analysis we need to always adhere to best practices. For this example my workstation and emulator were connected to the internet. Notice the green dot next to the username at the bottom of the following image.
 |
| Logged In |
Make sure your workstation is not connected to the internet since some applications will reach out and log in to the servers that the app uses. This could cause an issue where the analyst might inadvertently conduct a search/download of data from the server without proper legal authorization.
Be aware that emulator analysis like this one might not work with applications that are closely integrated with the operating system, e.g. Google apps.
In my testing I have found that by closing the app or shutting down the emulator, the pushed data is no longer accessible and the app returns an invalid install error message. Make sure to take screenshots or video capture the pertinent screens before you close the app or shutdown the emulator. To access the app and data after shutdown will require reinstalling Nox and redoing the whole procedure again.